This article explores the step-by-step process of creating a rustic and affordable room divider using pallet wood. Learn about materials, tools, and techniques to enhance your living space effectively.
Understanding the essential materials for your pallet wood project is crucial. Here’s a list of the main components:
- Pallets: Choose high-quality pallets that are free from damage.
- Wood screws: Essential for securing the pallets together.
- Sandpaper: For smoothing rough edges.
- Wood stain or paint: To finish your divider and enhance its appearance.
- Protective finish: Such as polyurethane to seal and protect the wood.
Selecting the right pallets is vital for both aesthetics and durability. Look for:
- Size: Ensure the pallets fit the dimensions you need.
- Condition: Avoid pallets with broken slats or excessive wear.
- Wood type: Hardwoods are generally more durable than softwoods.
Having the right tools makes any DIY project easier. Essential tools include:
- Power saw: For cutting pallets to the desired size.
- Drill: To make holes for screws.
- Screwdriver: For securing the screws.
- Measuring tape: To ensure accurate dimensions.
- Level: To check that your divider is straight.
Preparation is key to a successful project. Follow these steps:
1. Dismantle the pallets carefully using a pry bar.2. Clean the wood to remove dirt and debris.3. Sand down rough areas to prevent splinters.4. Treat the wood to eliminate pests and contaminants.
Exploring design options allows for creativity. Consider these styles:
- Simple screens: Lightweight and easy to move.
- Multi-panel dividers: For larger spaces, providing more coverage.
- Decorative patterns: Adding artistic flair to your divider.
Assembling your room divider requires careful planning:
1. Lay out the pallets in your desired configuration.2. Secure the pallets together using wood screws.3. Ensure everything is aligned and level.4. Allow the assembly to dry completely before moving.
Finishing touches can elevate your project. Consider:
- Staining: Enhances the natural grain of the wood.
- Painting: Adds color and personality to your divider.
- Sealing: Protects against moisture and wear.
Stability is essential for any room divider. Use these methods:
- Anchoring: Secure the divider to the wall if necessary.
- Weight distribution: Ensure the base is heavy enough to prevent tipping.
Budgeting is crucial for any DIY project. Consider the following costs:
- Pallets: Often free or low-cost.
- Tools: If you don’t own them, consider rental options.
- Finishing materials: Budget for stains and sealants.
Maintenance ensures longevity. Here are some care tips:
- Regular cleaning: Dust and wipe down the surface.
- Inspect for damage: Check for any signs of wear or pests.
- Reapply sealant: As needed to protect the wood.
Understanding the benefits of pallet wood can influence your choice:
- Sustainability: Reusing pallets reduces waste.
- Cost-effectiveness: Pallets are often free or inexpensive.
- Unique aesthetics: Each pallet has its own character and charm.
 1")
What Materials Do You Need for a Pallet Wood Room Divider?
When embarking on a DIY project to create a pallet wood room divider, understanding the essential materials is critical to ensure a successful outcome. This guide will delve into the various types of wood, tools, and additional supplies necessary for crafting a sturdy and visually appealing room divider.
Choosing the right type of wood is fundamental. Pallet wood is often made from different species, and each has its unique characteristics:
- Softwoods: Commonly used for pallets, such as pine or fir, these woods are lightweight and easy to work with.
- Hardwoods: Woods like oak or maple offer greater durability but can be heavier and more challenging to cut.
- Reclaimed Wood: Utilizing reclaimed pallets not only adds character but also promotes sustainability.
Having the right tools can make a significant difference in the efficiency and quality of your build. Here are the essential tools you will need:
- Circular Saw: For cutting the pallets to the desired size.
- Drill: Necessary for making holes and securing screws.
- Screwdriver: To assemble the pieces together securely.
- Measuring Tape: Ensures precision in your cuts and placements.
- Sandpaper or Sander: For smoothing rough edges and surfaces.
Beyond wood and tools, you will need several additional supplies to complete your project:
- Wood Screws: To hold the structure together firmly.
- Wood Glue: Provides extra bonding strength.
- Stain or Paint: To enhance the aesthetic appeal of your divider.
- Protective Finish: Such as polyurethane, to protect the wood from wear and tear.
Quality materials are vital for a long-lasting room divider. When sourcing your pallets, consider the following:
- Check for damage or rot that could compromise the integrity of the wood.
- Look for pallets that are heat-treated rather than chemically treated to avoid harmful substances.
- Ensure the wood is free from pests and contaminants, especially if you are using reclaimed materials.
By carefully selecting your materials and tools, you set the foundation for a successful pallet wood room divider project. With the right preparation and understanding of what you need, you can create a beautiful and functional addition to your living space that reflects your personal style.
 2")
How to Choose the Right Pallets for Your Project?
When it comes to creating a stunning and functional room divider using pallet wood, selecting the right pallets is essential for both aesthetics and durability. The pallets you choose will significantly impact the overall look and longevity of your project. In this section, we will delve into the critical factors to consider when selecting pallets, including size, condition, and wood type, ensuring that your build is not only successful but also visually appealing.
The size of the pallets plays a crucial role in the design of your room divider. Standard pallets typically measure 48 inches by 40 inches, but you might find various sizes depending on their origin. Choosing the right size is important as it affects both the height and width of your divider. Consider the space where the divider will be placed; a larger pallet can create a more substantial visual effect, while smaller pallets can offer a more delicate look. Always measure your space before purchasing to ensure a perfect fit.
Before you start your project, it’s vital to inspect the condition of the pallets. Look for signs of damage such as cracks, broken boards, or excessive wear. A damaged pallet can compromise the structural integrity of your divider, leading to safety issues. Make sure to choose pallets that are sturdy and free from rot or pest infestations. If you’re unsure, consider checking for the HT stamp, which indicates the pallet has been heat-treated and is safe for use.
The type of wood used in pallets can vary, with common options including pine, oak, and plywood. Each type of wood offers different aesthetic and durability characteristics. For instance, pine pallets are lightweight and easy to work with, making them a popular choice for DIY projects. On the other hand, oak pallets are denser and more durable, providing a more robust structure. Consider the style you want to achieve; oak can give a more rustic and sophisticated look, while pine offers a lighter, more casual appearance.
Finding quality pallets can be a challenge, but there are several places you can look. Local warehouses, shipping companies, and retail stores often have surplus pallets they are willing to sell or give away. Always inquire about the history of the pallets; avoid pallets that have been used for chemicals or hazardous materials. Online platforms and community groups can also be excellent resources for sourcing pallets. Just make sure to thoroughly inspect any pallets you acquire to ensure they meet your project’s needs.
Aesthetics are not just about appearance; they also influence how well the room divider integrates into your living space. Consider the overall design theme of your home. A well-chosen pallet can enhance your interior decor, adding a rustic charm that complements modern or traditional designs alike. Think about how the wood’s color and texture will interact with existing furniture and decor to create a cohesive look.
In summary, choosing the right pallets for your project involves careful consideration of size, condition, wood type, sourcing, and aesthetics. By focusing on these factors, you can ensure that your pallet wood room divider is not only visually appealing but also durable and functional. With the right pallets, your DIY project can transform your space beautifully and affordably.
 3")
What Tools Are Necessary for Building a Room Divider?
When embarking on a DIY project, especially one as creative as building a room divider from pallet wood, having the right tools is essential. The right tools not only make the process smoother but also enhance the quality of your work. Below, we detail the essential tools you will need, ensuring you are well-prepared for your pallet wood project.
- Measuring Tape: Accurate measurements are crucial. A good measuring tape helps you ensure that your cuts are precise and that your divider fits perfectly in your space.
- Handsaw or Circular Saw: To cut the pallet wood to size, you will need a reliable saw. A handsaw is great for smaller projects, while a circular saw can make quicker work of larger pieces.
- Drill: A power drill is necessary for making holes and driving screws. Choose one with adjustable speed settings for greater control.
- Screwdriver: While a drill can drive screws, having a manual screwdriver on hand is useful for any adjustments or tight spaces.
- Level: Ensuring that your room divider is straight and balanced is important for both aesthetics and stability. A level will help you achieve this.
- Sander: Sanding the wood will give it a smooth finish and remove any rough edges that could splinter. An electric sander can save you time and effort.
- Safety Gear: Don’t forget your safety glasses and gloves! Protecting yourself while working with tools is paramount.
Having these tools at your disposal not only makes your project easier but also ensures a professional-looking finish. Proper preparation and the right equipment will lead to a successful build that you can be proud of. Don’t hesitate to invest in quality tools; they can make all the difference in the world.
As you gather your tools, remember that each project is unique. Depending on your design and the complexity of your room divider, you may need additional tools. For instance, if you decide to incorporate decorative elements, you might require a jigsaw or a router. Always assess your specific needs before starting your project.
In summary, preparing for your pallet wood room divider involves more than just gathering materials; it requires a thoughtful selection of tools. With the right equipment in hand, you’ll be well on your way to creating a stunning and functional addition to your living space.
 4")
How to Prepare Your Pallets for Use?
Preparation is key to a successful project, especially when it comes to creating a room divider from pallet wood. Properly preparing your pallets ensures they are not only ready for construction but also safe and free from pests or contaminants. This section will guide you through the essential steps for preparing your pallets effectively.
Understanding the importance of preparing your pallets can significantly impact the outcome of your project. Unprepared pallets may harbor pests, mold, or harmful chemicals, which can compromise the integrity of your room divider and your living space. By following the right preparation steps, you can ensure a cleaner, safer, and more durable final product.
- Gather the Right Tools: You will need a pry bar, hammer, and safety goggles.
- Work in a Safe Environment: Ensure you have ample space and wear protective gear.
- Remove the Slats: Carefully pry apart the slats without damaging them, as you will reuse them.
Once your pallets are dismantled, it’s crucial to clean them properly. Here are some effective methods:
- Pressure Washing: This method removes dirt and grime effectively. Use a pressure washer to clean all surfaces.
- Soap and Water: For a gentler approach, scrub the wood with a mixture of soap and water, then rinse thoroughly.
After cleaning, treating your pallets is essential to eliminate any pests or contaminants:
- Heat Treatment: Exposing the wood to high temperatures can kill pests and larvae.
- Chemical Treatment: If necessary, use a non-toxic wood preservative to protect against mold and insects.
Once your pallets are prepared, inspect them for any signs of damage or contamination. Look for:
- Splits or Cracks: Ensure the wood is structurally sound.
- Signs of Pests: Check for any signs of infestation.
- Cleanliness: Ensure all surfaces are free from dirt and chemicals.
By taking the time to prepare your pallets properly, you can ensure that your room divider project is not only successful but also safe and environmentally friendly. This preparation will help you create a beautiful and functional divider that enhances your living space.
 5")
What Design Options Are Available for Room Dividers?
When it comes to creating a functional and aesthetically pleasing space, room dividers are an excellent solution. They not only provide privacy but also enhance the overall decor of your home. In this section, we will explore various design options available for room dividers, allowing you to unleash your creativity and find the perfect style that suits your needs.
- Simple Screens: These are the most basic form of room dividers. Made from lightweight materials, they are easy to move and can be used to create temporary separation in a room. Simple screens can be made from fabric, wood, or even metal, and can be designed in various colors and patterns to match your interior decor.
- Sliding Panels: For a more modern approach, consider sliding panels. This design allows for flexibility, as you can easily open or close the divider as needed. Sliding panels can be made from glass, wood, or a combination of materials, providing a sleek and contemporary look.
- Bookshelves: A bookshelf can double as a room divider, offering both functionality and style. This option not only separates spaces but also provides storage for books, plants, or decorative items. You can opt for an open design to maintain visibility or a closed design for more privacy.
- Folding Screens: Folding screens are versatile and come in various styles, from traditional to modern. They can be easily stored away when not in use and are available in a range of materials, including wood, fabric, and metal. Their portability makes them an excellent choice for renters or those who frequently rearrange their spaces.
- Plant Dividers: Incorporating greenery into your room divider design can bring a touch of nature indoors. Using tall plants or a vertical garden as a divider not only creates a natural barrier but also improves air quality and adds aesthetic appeal.
- Artistic Panels: For those looking to make a statement, artistic panels can serve as a unique room divider. These can be custom-made with intricate designs, patterns, or even artwork, allowing you to showcase your personal style while effectively dividing spaces.
Each of these design options has its own set of advantages and can be tailored to fit various spaces and styles. When selecting a room divider, consider factors such as space size, desired level of privacy, and overall decor of your home. Additionally, think about how the divider will be used—whether for temporary separation during gatherings or as a permanent fixture in your living space.
By exploring these diverse design options, you can create a room divider that not only serves a practical purpose but also enhances the beauty of your home. Let your imagination run wild, and choose a style that resonates with your personal taste and complements your living environment.
 6")
How to Assemble Your Pallet Wood Room Divider?
Assembling your pallet wood room divider is an exciting yet meticulous process that requires careful planning and execution. This guide will walk you through the step-by-step process to ensure your room divider is not only structurally sound but also visually appealing.
Before you start assembling, make sure you have all the necessary materials at hand. You will need:
- Pallets: Choose sturdy pallets that are in good condition.
- Wood screws: For securing the pallets together.
- Wood glue: To enhance stability.
- Sandpaper: For smoothing rough edges.
- Wood finish or stain: To enhance appearance and protect the wood.
Set up a clean and spacious area to work. Ensure you have adequate lighting and all your tools within reach. A workbench or a flat surface will make the assembly easier.
Begin by laying out the pallets in the desired configuration. You can opt for a straight divider or a more intricate design such as an archway or zigzag pattern. Visualize how the divider will look in your space to ensure it fits well.
Start assembling by placing one pallet on top of the other. Use wood screws to secure the pallets together at the corners. Make sure to drill pilot holes to prevent the wood from splitting. Apply wood glue between the pallets for added strength.
To maintain structural integrity, consider adding diagonal braces on the back of the divider. This will provide additional support and prevent wobbling. Use leftover pallet wood or purchase additional lumber for this purpose.
Once the structure is assembled, use sandpaper to smooth any rough edges. This step is crucial for safety and aesthetics. After sanding, apply your chosen wood finish or stain to protect the wood and enhance its appearance.
Carefully move your assembled room divider to its intended location. Ensure it is stable and does not tip over. If necessary, you can anchor it to the wall or the floor for added security, especially if it is tall.
Finally, personalize your room divider with decorative elements such as hanging plants, artwork, or string lights. This will not only enhance the aesthetic appeal but also make the divider a functional part of your living space.
By following these steps, you can successfully assemble a pallet wood room divider that is both functional and stylish. Enjoy your new space!
 7")
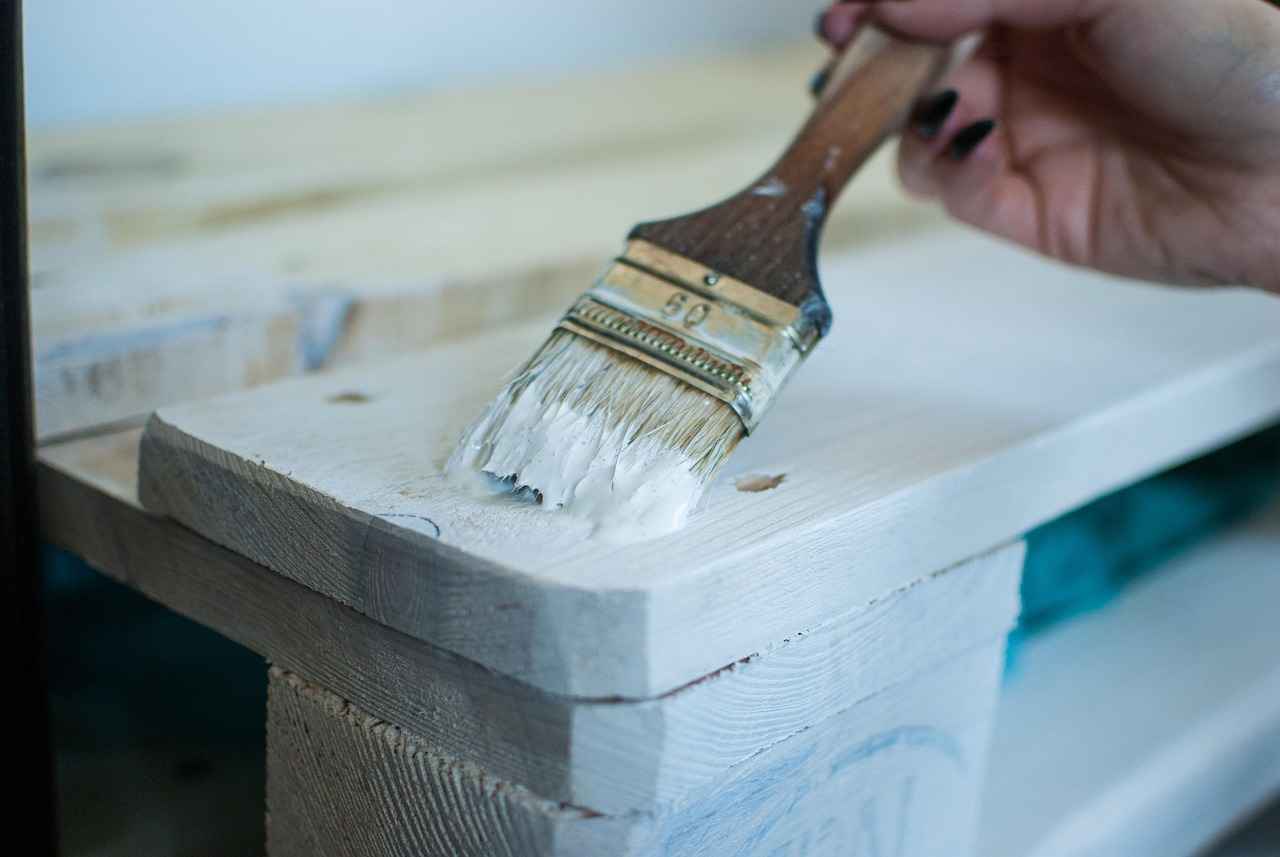
What Finishing Touches Can Enhance Your Divider?
When it comes to creating a stunning and functional pallet wood room divider, the finishing touches can truly make a difference. This section delves into various finishes, stains, and treatments that not only enhance the appearance of your divider but also extend its lifespan.
Applying a finish to your pallet wood room divider is essential for several reasons:
- Protection: Finishes protect the wood from moisture, dirt, and wear, ensuring your divider remains in great condition over time.
- Aesthetic Appeal: A well-chosen finish can highlight the natural beauty of the wood, adding character and warmth to your space.
- Longevity: Proper treatment can prevent issues such as warping or cracking, extending the life of your divider.
There are several finishing options available, each offering unique benefits:
- Oil Finishes: Products like tung oil or linseed oil penetrate the wood, enhancing its grain and providing a natural look. They are easy to apply and maintain.
- Varnishes: These create a hard protective layer on the surface, available in various sheens from matte to glossy. Varnishes are excellent for high-traffic areas as they resist scratches and wear.
- Stains: Stains can add color while still allowing the wood grain to show through. They are ideal for achieving a specific aesthetic while protecting the wood.
- Paint: For a bold look, consider painting your room divider. This option allows for complete customization in color but may require more frequent touch-ups.
Applying a finish is a straightforward process, but attention to detail is crucial:
1. Start with a clean, sanded surface to ensure the finish adheres properly.2. Use a brush, roller, or cloth to apply the finish evenly, following the wood grain.3. Allow the first coat to dry completely before applying additional coats as needed.4. Lightly sand between coats for a smoother finish.5. Follow the manufacturer’s instructions for drying times and application techniques.
In addition to traditional finishes, consider these treatments for added durability:
- Sealants: Applying a sealant can provide an extra layer of protection against moisture and stains.
- Wood Preservatives: These treatments help prevent rot and insect damage, especially in humid environments.
- Anti-fungal Treatments: If your divider will be exposed to moisture, using an anti-fungal treatment can prevent mold and mildew growth.
In conclusion, the right finishing touches can significantly enhance the appearance and durability of your pallet wood room divider. By selecting appropriate finishes and treatments, you not only improve the aesthetic appeal but also ensure that your divider stands the test of time. Whether you prefer a natural look or a bold color, the finishing touches are what will truly elevate your project.
 8")
How to Secure Your Room Divider in Place?
When creating a room divider, ensuring its stability is of utmost importance. A well-secured divider not only enhances the aesthetic appeal of your space but also provides the necessary functionality without the risk of tipping or movement. This section will delve into various methods for securing your room divider, focusing on effective anchoring techniques and optimal weight distribution.
Stability is crucial for safety and practicality. A room divider that is unstable can pose hazards, especially in households with children or pets. Moreover, an unsteady divider can diminish the overall look of your space, making it feel chaotic rather than organized. Therefore, understanding how to secure your divider is essential for both functionality and style.
- Wall Anchors: If your divider is positioned against a wall, consider using wall anchors. These can be easily installed and will help keep the divider in place.
- Brackets: Metal brackets can be attached to the divider and secured to the floor or wall, providing additional stability.
- Weighted Bases: Adding weight to the base of your divider can significantly reduce the risk of tipping. Use heavy materials like bricks or sandbags concealed within decorative elements.
Proper weight distribution is key to maintaining balance. Here are some strategies to ensure your room divider remains stable:
- Lower Center of Gravity: Position heavier items at the bottom of the divider to lower its center of gravity, making it less likely to tip over.
- Even Weight Distribution: Ensure that any decorative elements or shelves are evenly distributed across the divider to avoid putting too much weight on one side.
- Use of Materials: Choose materials that provide both strength and lightness. For example, using a combination of wood and metal can enhance durability while keeping the structure manageable.
In addition to anchoring techniques and weight distribution, consider these practical tips:
- Regular Checks: Periodically check the stability of your divider. Tighten any loose screws or brackets to maintain its integrity.
- Flooring Considerations: Ensure that your divider is placed on a level surface. Uneven flooring can lead to instability.
- Adjustable Feet: If your divider is on an uneven surface, consider adding adjustable feet to compensate for height differences.
By implementing these strategies, you can create a room divider that is not only beautiful but also safe and functional. Remember, a well-secured room divider enhances the overall ambiance of your living space, allowing you to enjoy the benefits of privacy and organization without the worry of instability.
 9")
What Are the Cost Considerations for Your Project?
Understanding the financial aspects of your DIY project is essential to ensure that it remains within your budget. When embarking on a project like building a pallet wood room divider, various cost factors come into play. This section will provide a detailed overview of the potential expenses involved, helping you keep your project affordable without compromising on quality.
When planning your budget, it is important to consider several key expenses:
- Materials: The primary cost will stem from the materials you choose. If you opt for reclaimed pallet wood, you may be able to source it for free or at a low cost. However, if you decide to purchase new wood, prices can vary significantly based on type and quality.
- Tools: Having the right tools is crucial. If you don’t already own them, you may need to invest in items such as saws, drills, and sanders. Consider borrowing tools or renting them to save on costs.
- Finishing Supplies: Paint, stain, or sealant can enhance the appearance and durability of your divider. These supplies can range in price, so it’s wise to shop around for the best deals.
- Hardware: Screws, brackets, and other fastening materials may seem minor, but they can add up. Be sure to account for these in your budget.
To get a clear picture of your total costs, follow these steps:
- Make a List: Begin by listing all the materials and tools required for your project. This will help you visualize what you need.
- Research Prices: Check local hardware stores and online retailers to gather price information. Don’t forget to include shipping costs if you order online.
- Set a Contingency Fund: It’s wise to allocate an additional 10-15% of your budget for unexpected expenses. This ensures you won’t be caught off guard by unforeseen costs.
Staying within budget doesn’t have to be a challenge. Here are some practical tips:
- Repurpose Materials: Look for opportunities to reuse materials from other projects or salvage items from local construction sites.
- Shop Sales: Keep an eye out for sales or discounts at hardware stores. Buying in bulk can also lead to significant savings.
- DIY Tools: If you’re handy, consider making some of your own tools or jigs to save on costs.
Effective planning is vital for staying on budget. By outlining your project in detail, you can better anticipate costs and avoid overspending. Create a timeline for your project, and stick to it to prevent unnecessary delays and additional expenses.
In conclusion, budgeting for your pallet wood room divider involves careful consideration of materials, tools, and additional supplies. By estimating costs accurately and employing strategies to save money, you can create a beautiful and functional room divider that enhances your living space without breaking the bank.
 10")
How to Maintain Your Pallet Wood Room Divider?
Maintaining your pallet wood room divider is essential for ensuring its longevity and aesthetic appeal. This guide offers practical tips and techniques to keep your divider looking great and functioning well over time.
Regular maintenance is crucial for preserving the integrity and appearance of your pallet wood room divider. Wood is susceptible to various elements such as moisture, pests, and wear over time. By implementing a consistent maintenance routine, you can extend the life of your divider and keep it in excellent condition.
- Regular Cleaning: Dust your divider regularly with a soft cloth to prevent dirt buildup. For deeper cleaning, use a damp cloth and mild soap, avoiding harsh chemicals that can damage the wood.
- Inspect for Damage: Periodically check for any signs of damage, such as cracks, splinters, or loose boards. Early detection can prevent more significant issues later on.
- Moisture Control: Keep your divider in a dry environment to prevent mold and mildew. If you notice any moisture issues, consider using a dehumidifier in the room.
Applying protective finishes can significantly enhance the durability of your pallet wood divider. Here are some options:
- Stains: Staining not only adds color but also helps protect the wood from moisture and UV damage. Choose a stain that suits your decor.
- Sealants: A good quality sealant can provide a protective barrier against spills and humidity. Look for water-based sealants for easy application and low odor.
- Varnishes: For a glossy finish, consider using a varnish. This will give your divider a polished look while protecting it from scratches and wear.
Pests can be a significant threat to wooden structures. If you notice signs of infestation, such as small holes or sawdust, take immediate action:
- Identify the Pest: Determine what type of pest is causing the damage. Common pests include termites and wood-boring beetles.
- Use Treatments: Apply appropriate pest control treatments, which may include sprays or professional extermination services.
- Prevent Future Infestations: Ensure your divider is treated with pest-repellent finishes and maintain a dry environment to deter pests.
Establishing a maintenance schedule can help keep your pallet wood room divider in top shape:
- Monthly: Dust and inspect for any visible signs of damage.
- Quarterly: Perform a deeper cleaning and check for moisture issues.
- Annually: Reapply protective finishes and conduct a thorough inspection for pests or structural integrity.
By following these maintenance tips, you can ensure that your pallet wood room divider remains a beautiful and functional part of your home for years to come. Regular care not only enhances its aesthetic but also contributes to a healthier indoor environment.
 11")
What Are the Benefits of Using Pallet Wood for Room Dividers?
When considering materials for your next DIY project, pallet wood stands out as a remarkable choice, especially for creating room dividers. Understanding the benefits of pallet wood can significantly influence your decision-making process. This section delves into the myriad advantages of using pallet wood, including its sustainability, cost-effectiveness, and unique aesthetics.
One of the most compelling reasons to use pallet wood is its sustainable nature. Pallet wood is often made from recycled materials, reducing the need for new timber and minimizing deforestation. By repurposing pallets, you are not only giving new life to discarded wood but also contributing to a more sustainable environment. This practice aligns perfectly with eco-friendly living, making it a responsible choice for environmentally conscious individuals.
Another significant advantage of pallet wood is its cost-effectiveness. Pallets can often be obtained for free or at a minimal cost from local businesses or warehouses. This affordability allows you to create stunning room dividers without breaking the bank. Additionally, the DIY aspect of using pallet wood means you can save on labor costs, making it an ideal option for budget-conscious homeowners.
Pallet wood brings a distinctive rustic charm to any space. Each piece of wood has its own history, character, and texture, which can add depth and warmth to your interior design. The natural variations in color and grain patterns create a unique look that is hard to replicate with manufactured materials. Whether you prefer a weathered finish or a polished look, pallet wood can be customized to fit your personal style.
Using pallet wood allows for a high degree of creativity and customization. You can easily modify the design, size, and finish of your room divider to match your specific needs and preferences. This flexibility makes it possible to create a piece that not only serves a functional purpose but also enhances the overall aesthetic of your living space.
Beyond sustainability, cost, and aesthetics, pallet wood is also known for its durability. When properly treated and maintained, pallet wood can withstand the test of time, making it a reliable choice for furniture and decor. Moreover, it is relatively easy to work with, making it accessible for DIY enthusiasts of all skill levels.
In summary, the benefits of using pallet wood for room dividers are numerous. From its sustainable and cost-effective nature to its unique aesthetics and durability, pallet wood offers a versatile solution for enhancing your living space. By opting for this material, you not only create a beautiful and functional divider but also make a responsible choice that aligns with eco-friendly principles.
Frequently Asked Questions
- How long does it take to build a pallet wood room divider?
Building a pallet wood room divider can take anywhere from a few hours to a couple of days, depending on your experience level and the complexity of the design. If you’re a DIY newbie, give yourself some extra time to get familiar with the tools and techniques!
- Can I use any type of pallet wood for my project?
While you can technically use any type of pallet, it’s best to choose ones made from hardwoods like oak or maple for durability. Always check for any chemical treatments, as some pallets are not safe for indoor use.
- Do I need special tools to assemble my room divider?
Not necessarily! Basic tools like a saw, drill, and screws will do the trick. However, having a sander and a level can make your project easier and ensure a professional finish.
- How can I ensure my room divider is stable?
To keep your divider stable, consider anchoring it to the wall or using weighted bases. Proper weight distribution is key to preventing it from tipping over!
- What maintenance does a pallet wood room divider require?
Maintaining your pallet wood divider is simple! Just dust it regularly and apply a wood conditioner or sealant every few years to keep it looking fresh and protect it from moisture.


