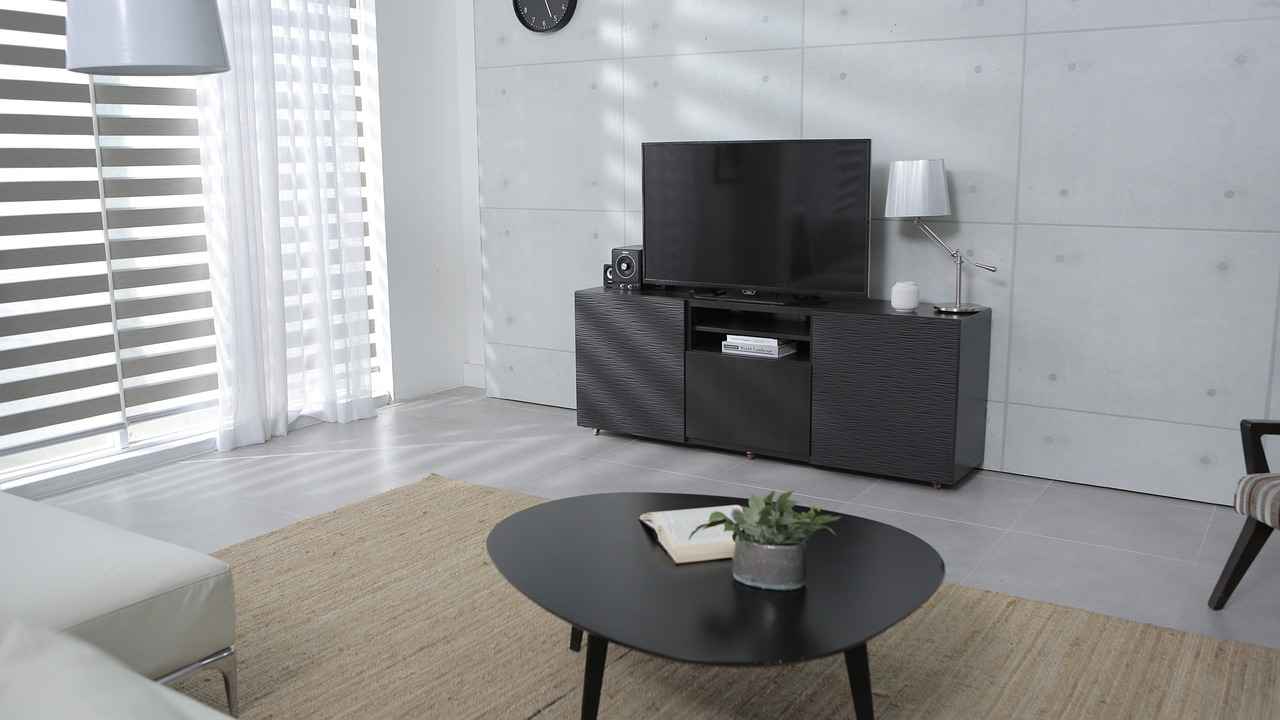
This article provides a step-by-step guide on creating a portable and flexible room divider on wheels, perfect for maximizing space and enhancing privacy in any room.
Creating your own room divider offers several advantages. Not only can you customize it to fit your space and style, but it is also a cost-effective solution compared to store-bought options. Additionally, a DIY project allows you to tailor the divider to meet your specific needs, whether it's for a home office, studio apartment, or children's play area.
To build a sturdy and functional room divider, you will need the following materials:
- Wood (plywood or solid wood)
- Fabric for privacy
- Wheels for mobility
- Wood glue and screws
- Paint or stain for finishing
When selecting wood for your room divider, consider durability, weight, and aesthetics. Plywood is often a favored choice due to its affordability and ease of handling, while solid wood may offer a more elegant finish.
Gather the following tools for a seamless construction process:
- Measuring tape
- Power saw or hand saw
- Drill
- Screwdriver
Begin by measuring the space where you plan to place the divider. Cut the wood pieces to the desired dimensions, ensuring accuracy for a perfect fit.
Once the wood is cut, assemble the frame by connecting the pieces with wood glue and screws. This step is crucial for ensuring the stability and durability of your room divider.
To enhance mobility, attach wheels to the bottom of your divider. This allows for easy movement and reconfiguration of your space.
Select wheels that can support the weight of your divider and provide smooth movement. Look for locking wheels to keep the divider stationary when needed.
Personalize your room divider with paint or fabric to match your decor. Consider using stencils for unique designs or an ombre effect for a modern touch.
To keep your DIY room divider in excellent condition, regularly clean it with appropriate materials. For any minor damage, follow simple repair techniques to maintain its functionality.
In summary, building a DIY room divider on wheels is an enriching project that not only enhances the aesthetics of your space but also offers practical solutions for privacy and organization. With the right materials and tools, you can create a functional piece that suits your needs.
Why Choose a DIY Room Divider?
When it comes to optimizing your living space, DIY room dividers offer a multitude of benefits that go beyond mere aesthetics. Crafting your own room divider not only allows for personalization but also provides a cost-effective solution tailored to your unique needs. Let's explore the key advantages of creating a DIY room divider.
One of the most significant benefits of making your own room divider is the ability to customize it according to your personal style and preferences. Whether you prefer a modern look with clean lines or a more rustic feel with natural wood finishes, the choice is entirely yours. You can select the dimensions, materials, and colors that best fit your space, ensuring that your divider complements the existing decor seamlessly.
Purchasing a pre-made room divider can be expensive, especially if you are looking for something unique or high-quality. By opting for a DIY approach, you can save a significant amount of money. With careful planning and sourcing of materials, you can create a beautiful and functional room divider for a fraction of the cost. Plus, many of the materials can be found at local hardware stores or even repurposed from old furniture, making it an eco-friendly option as well.
DIY room dividers can be designed with specific functionality in mind. Whether you need a divider for privacy, to define spaces in an open floor plan, or to create a cozy reading nook, you can tailor your design to meet your needs. Consider incorporating features like shelves, hooks, or even integrated lighting to enhance the usability of your divider.
Another advantage of a DIY room divider is its flexibility. Unlike fixed partitions, a movable room divider can be easily relocated or adjusted according to your changing needs. This is particularly beneficial in spaces that serve multiple purposes, such as a home office that also functions as a guest room. With wheels or a lightweight design, you can effortlessly reposition your divider to create the perfect layout for any occasion.
Building your own room divider is a fantastic way to express your creativity. You can experiment with various design techniques, such as painting, stenciling, or using different textures and materials. This project provides an opportunity to showcase your artistic skills and create a statement piece that reflects your personality.
In summary, the advantages of making your own room divider are numerous. From cost savings and customization to enhanced functionality and creative expression, a DIY room divider can significantly improve your living space. By investing time and effort into this project, you can create a unique solution that meets your needs and elevates your home decor.
Essential Materials for Your Room Divider
Creating a DIY room divider is a fantastic way to enhance your living space, offering both practicality and style. Below, we provide a comprehensive overview of the essential materials needed to build a sturdy and functional room divider.
When embarking on your room divider project, having the right materials is crucial. Here’s a detailed list:
- Wood: Choose high-quality wood for the frame. Common options include plywood or solid wood. These materials provide the necessary strength and stability.
- Fabric: Select a durable fabric that complements your decor. Consider options like canvas, cotton, or linen for a stylish finish.
- Wheels: To enhance mobility, choose sturdy wheels that can support the weight of your divider. Look for locking wheels for added stability when stationary.
- Hardware: Gather necessary hardware such as screws, hinges, and brackets to ensure a secure assembly.
- Paint or Stain: If you wish to finish the wood, select a non-toxic paint or stain that matches your interior style.
In addition to materials, having the right tools is essential for a smooth assembly process. Here’s what you’ll need:
- Measuring Tape: For precise measurements of wood and fabric.
- Saw: A circular saw or hand saw will help you cut the wood to the desired dimensions.
- Drill: Necessary for making holes for screws and assembling the frame.
- Screwdriver: To tighten screws and secure the hardware.
- Level: To ensure that your room divider stands straight and stable.
Safety should always be a priority when working on a DIY project. Equip yourself with the following:
- Safety Goggles: Protect your eyes from sawdust and debris.
- Work Gloves: Prevent cuts and injuries while handling materials.
- Dust Mask: Useful when sanding or painting to avoid inhaling harmful particles.
When selecting materials for your room divider, consider the following:
- Durability: Opt for materials that can withstand daily use and wear.
- Style: Ensure the design and colors align with your existing decor.
- Budget: Keep an eye on costs and choose materials that fit within your budget while still providing quality.
By carefully selecting your materials and tools, you can create a beautiful and functional room divider that enhances your space. With the right preparation, your DIY project can be both enjoyable and rewarding.
Choosing the Right Wood
When it comes to creating a DIY room divider, is crucial for both functionality and aesthetics. The type of wood you select will significantly impact the durability, weight, and overall appearance of your divider. This guide will help you understand the different types of wood available and how to make the best choice for your project.
The wood you choose for your room divider will determine its stability and longevity. Additionally, it plays a vital role in how the divider complements your existing decor. Opting for the right type of wood ensures that your divider can withstand daily use while also enhancing the visual appeal of your space.
- Plywood: Known for its lightweight and affordable nature, plywood is an excellent choice for those looking to create a mobile divider. It is made by gluing together thin layers of wood veneer, making it resistant to warping.
- Solid Wood: This option offers strength and durability, making it ideal for more permanent installations. Solid wood can be heavier, which may affect portability, but it brings a natural beauty that is hard to replicate.
- MDF (Medium Density Fiberboard): A cost-effective alternative, MDF is easy to work with and provides a smooth surface for painting or veneering. However, it is less durable than plywood or solid wood.
- Reclaimed Wood: For those looking to incorporate an eco-friendly option, reclaimed wood offers a unique aesthetic with a story behind it. This type of wood can vary in weight and durability depending on its previous use.
When selecting wood for your room divider, consider the following factors:
- Durability: Will it withstand daily wear and tear? Solid wood is typically more durable than plywood or MDF.
- Weight: If you plan to move the divider frequently, opt for lighter materials like plywood or MDF.
- Aesthetics: Choose a wood type that complements your existing decor. Solid wood offers a classic look, while plywood can be painted or stained to fit your style.
Once you've selected the right wood, consider how you will finish it. Different finishing techniques can enhance the appearance and protect the wood:
- Staining: This can bring out the natural grain of the wood and add color.
- Painting: A great way to match your divider to your decor, painting also adds a layer of protection.
- Sealing: Use a sealant to protect against moisture and wear, especially for wood that will be in high-use areas.
In conclusion, understanding the properties of different types of wood is essential when creating a room divider. By considering factors such as durability, weight, and aesthetics, you can ensure that your DIY project not only serves its purpose but also enhances the beauty of your space.
Plywood vs. Solid Wood
When embarking on a DIY project, one of the most critical decisions is choosing the right material. Two of the most popular options are plywood and solid wood. Both materials have their unique advantages and disadvantages, which can significantly impact your project's outcome. Here, we will explore these factors, including cost, ease of use, and overall durability.
In terms of cost, plywood generally comes out on top. It is often less expensive than solid wood, making it an attractive option for budget-conscious DIYers. Plywood is manufactured from layers of wood veneer, which allows it to be produced more efficiently. On the other hand, solid wood, derived from a single piece of timber, tends to be more expensive due to the higher cost of raw materials and the time-consuming process involved in its production.
When it comes to ease of use, plywood often proves to be more user-friendly. It is lighter than solid wood, making it easier to handle and maneuver during your project. Additionally, plywood is less prone to warping and splitting, which can be a significant advantage for beginners. Solid wood, while beautiful and sturdy, can be challenging to work with due to its weight and tendency to warp, especially if not properly stored.
In terms of durability, solid wood typically has the upper hand. It is known for its strength and longevity, making it an excellent choice for furniture and fixtures that require a robust structure. Plywood, while durable, may not withstand heavy loads as well as solid wood. However, high-quality plywood can still offer significant durability for many DIY projects.
When considering aesthetic appeal, solid wood often wins due to its natural grain patterns and rich textures. It can be sanded and stained to enhance its appearance, making it a preferred choice for visible structural elements. Plywood, while it can be finished to look attractive, often has a more uniform appearance, which may not appeal to everyone.
From an environmental perspective, plywood can be more sustainable, especially if sourced from responsibly managed forests. Many plywood manufacturers utilize fast-growing trees, which can help reduce deforestation. Conversely, solid wood can contribute to environmental concerns if sourced from endangered species or unsustainable logging practices. Always look for certifications like FSC (Forest Stewardship Council) to ensure responsible sourcing.
Ultimately, the choice between plywood and solid wood depends on your specific project requirements, budget, and personal preferences. If you're looking for a cost-effective and user-friendly option, plywood may be the way to go. However, if you desire a more traditional look and long-lasting durability, solid wood could be the better choice. Consider your project's needs carefully to make the most informed decision.
Wood Finishing Options
When it comes to enhancing the beauty and durability of your DIY room divider, play a crucial role. These techniques not only improve the appearance of the wood but also provide essential protection against wear and tear. In this section, we will explore various finishing techniques, such as staining and painting, that can elevate the look of your room divider while safeguarding the wood.
Wood finishing is vital for several reasons:
- Aesthetic Appeal: Finishing techniques can transform the natural look of wood, highlighting its grain and color.
- Protection: A good finish protects the wood from moisture, dirt, and damage, extending its lifespan.
- Customization: Finishing allows you to customize the look of your room divider to match your home decor.
Staining is a popular choice for enhancing the natural beauty of wood. Here’s how to effectively stain your room divider:
- Choose the Right Stain: Select a stain that complements your interior design. Gel stains are great for even application, while liquid stains can penetrate deeper.
- Prepare the Surface: Sand the wood lightly to create a smooth surface. Clean off any dust before applying the stain.
- Application: Use a brush or cloth to apply the stain, working in the direction of the grain. Wipe off excess stain to avoid blotchiness.
- Seal the Finish: After the stain dries, apply a clear coat to protect the color and add shine.
If you prefer a bold look, painting your room divider can be an excellent option. Here’s a simple guide:
- Choose Quality Paint: Opt for high-quality paint designed for wood surfaces. Acrylic latex paints are a durable choice.
- Prepare the Wood: Similar to staining, ensure the surface is smooth and clean. Use primer for better adhesion, especially if you’re covering a dark stain.
- Application Techniques: Use a roller for large areas and a brush for edges. Multiple thin coats will yield a better finish than one thick coat.
- Finishing Touches: Once dry, consider adding a clear topcoat for added protection and durability.
In addition to staining and painting, there are other techniques to consider:
1. Varnishing: Provides a hard, protective finish that enhances the wood's natural grain.2. Oiling: Penetrates the wood, offering a natural look with a soft sheen.3. Waxing: Gives a low-sheen finish, ideal for achieving a vintage look.
Ultimately, the choice of finish depends on your personal style and the intended use of the room divider. Whether you prefer the natural look of stained wood or the vibrant colors of paint, the right finish can significantly enhance your room's aesthetic. Remember to always test your chosen finish on a small, inconspicuous area to ensure it meets your expectations.
By understanding and applying these wood finishing techniques, you can create a stunning and durable room divider that not only serves its purpose but also adds a touch of elegance to your space.
Fabric Selection for Added Privacy
When it comes to creating a room divider, fabric selection plays a crucial role in achieving both privacy and aesthetic appeal. The right fabric can enhance your decor while providing the necessary separation between spaces. Here’s a comprehensive guide to help you choose the perfect fabric for your DIY room divider.
The fabric you choose for your room divider not only impacts its visual appeal but also its functionality. A well-selected fabric can:
- Enhance Privacy: Certain fabrics can block visibility while still allowing light to filter through.
- Control Acoustics: Thicker fabrics can help absorb sound, creating a quieter environment.
- Complement Your Decor: The right fabric can tie together the overall look of your room.
When selecting fabric for your room divider, consider the following types:
- Sheer Fabrics: These lightweight materials allow light to pass through while offering minimal privacy. Ideal for separating spaces without completely blocking visibility.
- Opaque Fabrics: Heavier materials such as canvas or upholstery fabric provide excellent privacy and are suitable for more permanent installations.
- Sound-Absorbing Fabrics: Look for fabrics designed to reduce noise, such as velvet or thicker polyester blends, to enhance acoustic comfort.
Choosing a fabric that complements your existing decor is essential. Here are some tips:
- Color Coordination: Select colors that match or contrast effectively with your walls and furniture. Use a color wheel to find complementary shades.
- Pattern Selection: If your room features solid colors, consider a patterned fabric for the divider to add visual interest. Conversely, choose solid fabrics for a more cohesive look in a busy environment.
- Texture Consideration: Mixing different textures can create depth in your space. For example, pairing a smooth fabric with a textured one can enhance the overall design.
Durability and maintenance are key factors to consider when selecting fabric. Here are some practical insights:
- Washability: Opt for fabrics that are easy to clean, especially if the divider will be in a high-traffic area.
- Fade Resistance: Choose fabrics that resist fading from sunlight exposure to maintain their vibrant appearance over time.
- Fire Resistance: For safety, especially in areas like bedrooms or living rooms, consider fire-retardant fabrics.
Before making a final decision, it’s wise to test the fabric’s privacy level:
- Layering: Hold the fabric up to a light source to see how much light passes through. Layering two sheer fabrics can increase privacy.
- Visibility Check: Stand behind the fabric to see if you can see through it. This will give you a practical sense of its effectiveness.
In conclusion, selecting the right fabric for your room divider is a vital step in enhancing both privacy and decor. By considering factors such as fabric type, color, texture, and maintenance, you can create a functional and stylish divider that meets your needs.
Tools You Will Need
When embarking on the exciting journey of creating your own room divider, having the right tools is crucial for achieving a successful outcome. This section will provide an overview of the essential tools required for building your room divider, including various types of saws, drills, and measuring instruments that will ensure accurate construction.
To start, let's explore the key tools you will need:
- Saws: A versatile tool for cutting wood to the desired dimensions. You can choose between a circular saw for straight cuts or a jigsaw for more intricate shapes.
- Drills: Essential for making holes for screws or dowels. A cordless drill is particularly handy for mobility and ease of use.
- Measuring Instruments: Accurate measurements are crucial. A tape measure, square, and level will help ensure your cuts and assembly are precise.
- Screwdrivers: Both flathead and Phillips screwdrivers will be needed for assembling the components of your room divider.
- Sandpaper: To smooth out any rough edges on your wood pieces, ensuring a polished finish.
- Clamps: These are important for holding pieces together securely while you work on assembly.
Using the right tools not only enhances the quality of your work but also increases safety during the construction process. For example, a circular saw offers efficiency in cutting larger pieces of wood, while a jigsaw allows for more detailed work. Ensuring that you have a cordless drill will save you time and effort, especially when you are working in tight spaces.
When deciding between power tools and hand tools, consider the efficiency and ease of use that power tools provide. However, hand tools can be more affordable and are often easier to control for detailed tasks. A balanced approach, using both types of tools, can yield the best results for your DIY room divider.
Safety should always be a top priority when working with tools. Ensure you have the following safety equipment:
- Safety Goggles: To protect your eyes from dust and debris.
- Gloves: To prevent cuts and splinters while handling wood.
- Dust Mask: To avoid inhaling harmful particles, especially when sanding.
By preparing adequately with the right tools and safety measures, you will set a solid foundation for your DIY room divider project. Not only will this ensure a smoother construction process, but it will also contribute to the overall quality and longevity of your finished product.
Power Tools vs. Hand Tools
When embarking on a DIY project, one of the most critical decisions you will face is whether to use power tools or hand tools. Each type of tool has its unique advantages, and understanding these can significantly impact the efficiency and ease of your project.
Power tools are machines powered by electricity, batteries, or compressed air. They include tools like drills, saws, and sanders. The primary benefit of using power tools is their efficiency. They can perform tasks much faster than hand tools, which is particularly useful for larger projects or when working with tough materials.
- Speed: Power tools can cut, drill, and sand materials in a fraction of the time it would take using hand tools.
- Precision: Many power tools come with features that enhance accuracy, such as laser guides or adjustable settings.
- Less Physical Effort: They require less physical strength, making them accessible to a wider range of users.
- Versatility: Power tools often come with interchangeable attachments, allowing for a variety of tasks with one tool.
Hand tools are tools that are operated manually without power. Examples include hammers, screwdrivers, and hand saws. While they may seem less efficient, hand tools have their own set of advantages that can be beneficial depending on the project.
- Control: Hand tools allow for greater control, especially in detailed work where precision is key.
- Cost-Effective: Generally, hand tools are less expensive than power tools and do not require electricity or batteries.
- Portability: They are often lighter and easier to transport, making them ideal for small jobs or tight spaces.
- Less Noise: Hand tools operate quietly, which can be a significant advantage in residential areas.
When it comes to efficiency, power tools typically have the upper hand, particularly for larger or more demanding projects. However, the ease of use associated with hand tools shouldn't be overlooked. For intricate tasks or when working in confined spaces, the control and precision offered by hand tools can lead to better results.
The decision between power and hand tools ultimately depends on the specific needs of your DIY project. If you are working on a large-scale task that requires speed and power, power tools are likely the best choice. Conversely, for smaller, more detailed work, hand tools may be more suitable.
In conclusion, both power tools and hand tools have their benefits and can be invaluable in different scenarios. Understanding the strengths of each will help you make informed choices that enhance your DIY experience.
Safety Equipment
When embarking on a DIY construction project, whether it's building a room divider or any other structure, the importance of safety gear cannot be overstated. Using appropriate safety equipment, such as goggles, gloves, and other protective gear, is essential to ensure your well-being during the construction process. Here’s a closer look at why safety equipment is critical and how it can protect you.
Engaging in construction activities often involves working with tools, heavy materials, and potentially hazardous substances. The risks associated with these tasks can lead to serious injuries if proper precautions are not taken. Here are a few reasons why investing in safety gear is crucial:
- Prevention of Eye Injuries: Safety goggles protect your eyes from flying debris, dust, and harmful chemicals that can cause serious damage.
- Hand Protection: Wearing gloves not only protects your hands from cuts and abrasions but also from exposure to hazardous materials.
- Respiratory Health: Masks can prevent inhalation of harmful dust and fumes, safeguarding your lungs during construction.
- Foot Safety: Steel-toed boots can protect your feet from heavy items that may accidentally fall during the construction process.
Choosing the right safety gear depends on the specific tasks you will be performing. Here’s a breakdown of essential safety equipment:
| Type of Safety Gear | Purpose |
|---|---|
| Safety Goggles | Protects eyes from debris and chemicals. |
| Work Gloves | Prevents cuts and provides grip. |
| Dust Masks/Respirators | Filters harmful particles from the air. |
| Ear Protection | Protects hearing from loud machinery. |
| Steel-Toed Boots | Protects feet from heavy objects. |
Simply having safety gear is not enough; it is vital to use it correctly. Here are some best practices:
- Always wear goggles when using power tools or when there's a risk of flying debris.
- Ensure gloves fit properly to maintain dexterity while providing protection.
- Use a respirator when sanding, painting, or working with materials that produce dust or fumes.
- Wear ear protection in environments where noise levels exceed safe limits.
- Make sure your steel-toed boots are comfortable and provide adequate support.
In summary, safety equipment is not just an accessory; it is a necessity when engaging in DIY construction projects. By prioritizing safety gear, you can significantly reduce the risk of injury, allowing you to focus on your project with peace of mind. Always remember that taking the time to equip yourself properly is an investment in your health and safety.
Step-by-Step Instructions for Building Your Divider
Building your own room divider can be an exciting and fulfilling project that not only enhances your living space but also allows for customization to fit your unique style. Below is a detailed guide that provides step-by-step instructions for creating a room divider on wheels, ensuring a smooth and enjoyable construction process.
Follow these systematic steps to create a functional and stylish room divider:
- Measuring and Cutting the Wood:
Begin by measuring the space where you plan to place your room divider. Use a measuring tape to determine the height and width required. Mark the measurements on your wood pieces using a pencil. Carefully cut the wood using a saw, ensuring that each piece is precise to avoid any issues during assembly.
- Assembling the Frame:
Once you have cut your wood pieces, it's time to assemble the frame. Start by laying out the pieces on a flat surface. Use wood glue or screws to join the corners securely. Ensure that the frame is square by measuring the diagonals; they should be equal. This guarantees stability in the final product.
- Attaching the Fabric:
Select a fabric that complements your decor while providing the necessary privacy. Cut the fabric to size, leaving a little extra for folding over the edges. Use a staple gun to attach the fabric to the frame, pulling it taut to avoid wrinkles.
- Adding Wheels for Portability:
To make your room divider mobile, choose sturdy wheels that can support the weight of the divider. Attach the wheels to the bottom corners of the frame using screws. Ensure they are securely fastened to allow for easy movement.
- Finishing Touches:
Once the main structure is complete, consider adding decorative elements like paint or additional fabric details. This is your chance to personalize your room divider to match your style. Use non-toxic paint and sealants to ensure safety and durability.
Throughout the construction process, remember to wear appropriate safety gear, including goggles and gloves. This will protect you from any potential hazards while using tools and handling materials.
By following these step-by-step instructions, you can successfully create a portable room divider that not only serves its purpose but also enhances the aesthetic appeal of your space. Enjoy the process of building and customizing your divider to reflect your personal taste!
Measuring and Cutting the Wood
Creating a DIY room divider can be a rewarding project, especially when you can customize it to fit your space perfectly. One of the most critical steps in this process is accurately. This guide will provide you with essential tips and techniques to ensure your wood pieces are cut to the correct dimensions, making your project easier and more successful.
Accurate measurements are crucial for several reasons:
- Fit: Properly measured pieces ensure that your divider fits snugly in your desired space.
- Stability: Accurate cuts contribute to the overall stability of the structure.
- Aesthetics: Well-measured pieces create a visually appealing look that enhances your decor.
Before you begin, gather the following tools:
- Measuring Tape: For precise measurements.
- Square: To ensure your cuts are straight and angles are correct.
- Level: To check for evenness in your cuts and assembly.
- Saw: A circular saw or miter saw works best for clean cuts.
- Pencil: For marking measurements on the wood.
Follow these steps to measure your wood accurately:
1. Start by determining the dimensions of your room divider. 2. Use a measuring tape to measure the height and width you need.3. Mark the measurements on the wood using a pencil.4. Double-check your measurements to avoid mistakes.
Once you have your measurements, it's time to cut:
- Set Up Your Workspace: Ensure your workspace is clean and well-lit. Secure the wood on a stable surface.
- Use a Straight Edge: Align a straight edge or a square along your marked line to guide your saw.
- Cut Slowly and Steadily: When using a saw, maintain a steady hand and follow your marked line closely.
- Check Your Cuts: After cutting, measure the pieces again to ensure they match your intended dimensions.
Here are some common pitfalls to watch out for:
- Not Measuring Twice: Always measure twice before cutting to avoid mistakes.
- Using Dull Blades: Ensure your saw blades are sharp for clean cuts.
- Ignoring Safety Precautions: Always wear safety goggles and follow safety guidelines when using power tools.
By following these steps and tips, you can ensure that your wood pieces are measured and cut accurately, setting a solid foundation for constructing your DIY room divider. With precision and care, your project will not only be functional but also a beautiful addition to your space.
Assembling the Frame
Assembling the wooden frame of your DIY room divider is a crucial step that ensures both stability and durability in your final product. This guide will provide you with a detailed, step-by-step approach to successfully construct a sturdy frame that will stand the test of time.
The frame serves as the backbone of your room divider. A well-constructed frame not only enhances the overall aesthetics of the divider but also ensures it can withstand daily use without compromising its structural integrity. Here are some key reasons why proper assembly is essential:
- Stability: A solid frame prevents wobbling and tipping.
- Durability: Quality assembly techniques can prolong the life of your divider.
- Safety: A well-assembled frame reduces the risk of accidents.
Before you begin, gather the following tools to aid in the assembly process:
- Power Drill: For creating holes and securing screws.
- Screwdriver: Essential for tightening screws.
- Measuring Tape: To ensure accurate dimensions.
- Square: For checking right angles.
Follow these steps to assemble your wooden frame effectively:
- Measure and Cut: Start by measuring the wood pieces according to your design. Use a saw to cut the wood accurately.
- Lay Out the Frame: Arrange the cut pieces on a flat surface to visualize the frame layout. Ensure that the corners are square.
- Drill Pilot Holes: Before screwing the pieces together, drill pilot holes to prevent the wood from splitting.
- Secure the Corners: Use screws to attach the corners of the frame. Ensure they are tightened adequately for maximum stability.
- Reinforce with Braces: For added strength, consider adding diagonal braces at the corners. This step is especially important for larger dividers.
- Check for Level: Use a level to ensure the frame is even. Adjust as necessary before finalizing the assembly.
To guarantee that your frame is not only stable but also durable, consider the following tips:
- Use Quality Materials: Choose high-quality wood that can withstand wear and tear.
- Apply Wood Glue: In addition to screws, applying wood glue at joints can enhance stability.
- Regular Maintenance: Periodically check the frame for loose screws or wear, and address any issues promptly.
By following these steps and tips, you can successfully assemble a wooden frame that provides a strong foundation for your DIY room divider. Remember, the quality of your assembly directly impacts the longevity and functionality of your final product.
Adding Wheels for Portability
When it comes to enhancing the functionality of your DIY room divider, adding wheels is a game-changer. This addition not only allows for easy movement but also provides the flexibility to reconfigure your living space as needed. Whether you're looking to create a cozy reading nook or a temporary guest area, wheels can significantly enhance the usability of your divider. Below, we explore essential tips for incorporating wheels into your room divider project.
Adding wheels to your room divider offers numerous benefits:
- Mobility: Easily move the divider to change room layouts.
- Space Efficiency: Create flexible spaces that can adapt to various activities.
- Convenience: Simplifies cleaning and rearranging furniture.
Selecting the appropriate wheels is crucial for ensuring that your room divider is both functional and aesthetically pleasing. Here are some factors to consider:
- Weight Capacity: Ensure the wheels can support the weight of your divider. Look for wheels rated for at least 50% more than the expected weight.
- Locking Mechanism: Consider wheels with locks to keep the divider stable when in use.
- Material: Choose wheels made from durable materials like rubber or polyurethane for smooth movement and floor protection.
Properly installing the wheels is essential for the stability and functionality of your room divider. Follow these steps for a secure attachment:
1. Gather your materials: wheels, screws, a drill, and a measuring tape.2. Measure and mark the locations where the wheels will be attached, ensuring they are evenly spaced.3. Pre-drill holes for the screws to avoid splitting the wood.4. Attach the wheels securely using screws, ensuring they are aligned straight for optimal movement.5. Test the mobility of the divider to ensure smooth operation.
To keep your room divider on wheels in top condition, consider the following maintenance tips:
- Regular Cleaning: Dust and clean the wheels to prevent dirt buildup that can hinder movement.
- Lubrication: Occasionally lubricate the wheel mechanisms to ensure they roll smoothly.
- Check for Damage: Inspect the wheels and attachment points regularly for signs of wear or damage.
In summary, adding wheels to your room divider not only enhances its functionality but also allows for a more dynamic living space. By selecting the right wheels and ensuring secure installation, you can enjoy the benefits of a portable and flexible divider that meets your evolving needs.
Choosing the Right Wheels
When it comes to creating a DIY room divider on wheels, selecting the right wheels is crucial for both functionality and aesthetics. The wheels will determine how easily your divider can be moved and how well it can support its weight. Here’s a comprehensive guide to help you choose the right wheels for your project.
- Weight Capacity: Ensure the wheels can support the total weight of your room divider. Consider the materials used in the divider, including wood and fabric, and calculate the overall weight. Look for wheels that can handle at least 25% more than your calculated weight for safety.
- Wheel Size: The size of the wheels affects mobility. Larger wheels can roll over uneven surfaces more easily, while smaller wheels may be better for smooth floors. A diameter of 3 to 5 inches is typically suitable for room dividers.
- Material: Wheels come in various materials, including plastic, rubber, and metal. Rubber wheels are ideal for hardwood floors as they provide better grip and prevent scratches. Plastic wheels are lighter but may not offer the same durability.
- Locking Mechanism: If you want your room divider to stay in place, consider wheels with a locking mechanism. This feature prevents the divider from rolling away when you need it stationary, adding an extra layer of safety.
- Design and Aesthetics: Choose wheels that complement the overall design of your room divider. Sleek, modern wheels can add a contemporary touch, while vintage-style wheels can enhance a rustic aesthetic.
- Swivel Wheels: These wheels can rotate 360 degrees, making it easy to maneuver your room divider around corners and tight spaces.
- Fixed Wheels: Fixed wheels only roll in one direction, which can provide more stability if your divider will remain in a straight line.
- Heavy-Duty Wheels: If your room divider is particularly large or heavy, consider heavy-duty wheels designed for industrial use. These can handle significant weight and provide durability.
Once you have chosen the right wheels, proper installation is essential for functionality. Here are some installation tips:
- Positioning: Ensure that the wheels are positioned evenly on the bottom of the frame to maintain balance. Use a measuring tape to mark the exact locations before drilling.
- Secure Fastening: Use screws that are appropriate for the wheel type and material of your room divider. Make sure to tighten them securely to prevent wobbling.
- Test Mobility: After installation, test the mobility of your room divider on different surfaces. Check for any resistance or wobbling and adjust as necessary.
Choosing the right wheels for your room divider is not just about functionality; it also enhances the overall design and usability of the divider. By considering weight capacity, wheel size, material, and design, you can ensure that your DIY project is both practical and visually appealing. Remember to install them correctly for the best performance, allowing you to enjoy the benefits of a portable and flexible room divider in your space.
Installation Techniques
When constructing a DIY room divider, installing wheels is crucial for ensuring portability and flexibility. However, it's equally important to ensure that the wheels are installed securely to maintain the integrity of the divider. This section will explore effective that guarantee smooth mobility without compromising the structure of the divider.
Proper installation of wheels is essential for several reasons:
- Stability: Securely installed wheels prevent wobbling and ensure that the divider stands firm.
- Mobility: Well-installed wheels allow for easy movement, enabling you to rearrange your space as needed.
- Longevity: Proper techniques reduce wear and tear on the wheels and the divider itself, extending its lifespan.
Before diving into installation techniques, it’s vital to select the right wheels. Consider the following:
- Weight Capacity: Ensure the wheels can support the total weight of the divider.
- Material: Choose wheels made from durable materials like rubber or polyurethane for smooth movement.
- Size: Larger wheels are better for uneven surfaces, while smaller wheels are suitable for smooth floors.
Here are some effective methods for securely installing wheels on your room divider:
Before attaching the wheels, pre-drill holes in the wood to avoid splitting. This technique allows for precise placement and ensures that the screws go in straight. Use a drill bit that is slightly smaller than the screws for a snug fit.
For added stability, consider using corner brackets to attach the wheels. This method distributes weight evenly and reinforces the connection between the wheel and the divider frame. Place the brackets at each corner where the wheel will be attached, ensuring a solid anchor.
Choose screws that are appropriate for the thickness of the wood. Using screws that are too short can lead to weak attachment, while overly long screws may protrude through the other side. A good rule of thumb is to use screws that are at least 1.5 times the thickness of the wood.
To enhance safety and stability, install locking mechanisms on the wheels. This feature prevents the divider from rolling unintentionally, especially when in use. Ensure that the locking mechanism is easily accessible for quick engagement and disengagement.
After installation, test the mobility of the divider. Push it gently to ensure it moves smoothly without any resistance. If you encounter any issues, check the wheel alignment and make necessary adjustments.
Once your wheels are installed, it’s important to conduct regular maintenance checks. Inspect the screws and brackets periodically to ensure they remain tight and secure. Lubricate the wheel bearings as needed to maintain smooth operation.
In summary, securely installing wheels on your DIY room divider is essential for achieving both functionality and durability. By following these installation techniques, you can create a portable and flexible space that adapts to your needs while maintaining the structural integrity of the divider.

Decorating Your Room Divider
When it comes to , the possibilities are endless. A room divider is not just a functional piece; it can also serve as a stunning focal point in your space. By utilizing various techniques such as paint, fabric, and decorative elements, you can create a personalized divider that complements your interior style beautifully.
Painting your room divider is one of the easiest ways to make it uniquely yours. Here are some creative ideas:
- Color Blocking: Use bold colors to create sections of color on your divider. This technique adds a modern touch and can brighten up any room.
- Stenciling: Incorporate patterns or designs using stencils. This method allows for intricate designs without needing advanced painting skills.
- Ombre Effect: Create a gradient effect by blending colors from dark to light. This visually appealing technique can add depth and texture.
Choosing the right fabric can greatly enhance the aesthetic and functionality of your room divider. Consider the following:
- Sheer Fabrics: These allow light to filter through while providing some privacy, ideal for creating a soft ambiance.
- Bold Prints: Opt for fabrics with vibrant patterns to make a statement. Floral or geometric prints can add character and style.
- Textured Fabrics: Materials like velvet or burlap can add a tactile element, making your room divider not just visually appealing but also inviting to touch.
Adding decorative elements can further enhance your room divider's appeal. Here are some ideas:
- Wall Decals: Use removable wall decals to add art or quotes. This is a temporary option that allows for easy changes.
- Hanging Plants: Attach small planters or air plants to your divider for a touch of greenery, which can also improve air quality.
- Mirrors: Incorporate mirrors into your design to create the illusion of more space and reflect light, making your room feel larger.
Absolutely! Combining various techniques can lead to a truly unique piece. For example, you could paint a bold color on the lower half of your divider while using sheer fabric on the upper half for a layered look. Mixing textures, colors, and patterns will ensure your room divider stands out.
In conclusion, personalizing your room divider with paint, fabric, and decorative elements is an exciting way to express your style. Whether you choose to go bold with colors or keep it subtle with textures, the key is to align your choices with your overall interior design. By following these tips, you can transform a simple divider into a stunning piece that enhances your living space.
Painting Techniques
When it comes to personalizing your DIY room divider, can transform a simple design into a stunning focal point. By utilizing various methods like stenciling, ombre, or even geometric patterns, you can create a unique piece that reflects your style and enhances your space. Below, we explore some popular painting techniques and how they can elevate your room divider project.
Stenciling is a versatile painting technique that allows for intricate designs without the need for advanced artistic skills. By using stencils, you can apply patterns or images that resonate with your personal taste. This method is particularly effective for creating borders or repeating motifs on your room divider.
- Materials Needed: Stencils, paintbrushes, paint, and painter's tape.
- Steps:
- Choose your stencil design and secure it with painter's tape.
- Use a brush or sponge to apply paint over the stencil.
- Carefully lift the stencil to reveal the design.
The ombre effect involves a gradual blending of colors, creating a stunning gradient on your room divider. This technique is perfect for adding depth and dimension, making your divider not just functional but also a work of art.
- Materials Needed: Multiple paint colors, a paintbrush or roller, and a sponge.
- Steps:
- Start with the lightest color at the top of the divider.
- Gradually blend in darker shades as you move downwards.
- Use a sponge to help blend the colors seamlessly.
Geometric patterns can add a modern touch to your room divider. By using painter's tape to create sharp lines and shapes, you can achieve a contemporary look that is both striking and stylish.
- Materials Needed: Painter's tape, multiple paint colors, and a brush or roller.
- Steps:
- Plan your geometric design and use painter's tape to outline the shapes.
- Paint the taped areas with your chosen colors.
- Once dry, carefully remove the tape to reveal clean lines.
Incorporating these painting techniques into your DIY room divider project not only enhances its aesthetic appeal but also allows for creative expression. By customizing your divider, you can ensure it complements your existing decor while serving its practical purpose.
- Cost-Effective: Painting your divider is a budget-friendly way to achieve a designer look.
- Personalization: You can create a piece that truly reflects your personality and style.
- Easy to Update: If your style changes, repainting is an easy way to refresh your space.
By exploring these painting techniques, you can create a DIY room divider that is not only functional but also a beautiful addition to your home. Whether you choose stenciling, ombre, or geometric patterns, your creativity will shine through, making your space uniquely yours.
Using Fabrics and Textiles
Using Fabrics and Textiles to Enhance Your Room DividerIncorporating different fabrics and textiles into your DIY room divider can significantly enhance both its visual appeal and functionality. By selecting the right materials, you can create a stunning focal point in your space while also ensuring that the divider serves its purpose effectively. Here are some suggestions on how to creatively use fabrics and textiles in your room divider design.
- Sheer Fabrics: These lightweight materials allow light to filter through while providing a degree of privacy. Options like organza or voile can create an ethereal feel.
- Opaque Fabrics: For maximum privacy, consider using heavier fabrics such as canvas or denim. These materials block light effectively and add a cozy touch.
- Textured Fabrics: Adding textures like velvet or linen can create visual interest and depth, making your divider more engaging.
Using patterned fabrics can add a dynamic element to your room divider. Consider the following:
- Bold Prints: Large floral or geometric patterns can serve as a statement piece in your room.
- Subtle Designs: Soft, muted patterns can add character without overwhelming your space.
- Mixing Patterns: If you're feeling adventurous, try combining different patterns for a unique look. Just ensure that the colors complement each other.
There are several effective methods for attaching fabrics to your room divider:
- Stapling: A quick and easy way to secure fabric to a wooden frame. Make sure to pull the fabric taut for a smooth finish.
- Sewing: If you want a more polished look, sewing the fabric onto a backing or directly onto the frame can provide durability.
- Velcro Strips: For a more flexible option, consider using Velcro. This allows you to easily change the fabric when desired.
To further personalize your room divider, consider adding decorative elements:
- Trims and Borders: Adding lace, tassels, or piping can give your divider a finished look.
- Artwork: Attach small frames or fabric panels with printed designs to create a gallery effect.
- Lighting: Incorporate string lights or LED strips behind sheer fabrics to create an enchanting glow.
Incorporating different fabrics and textiles into your room divider design allows for a blend of creativity and practicality. By carefully selecting materials, patterns, and decorative elements, you can create a stunning and functional piece that enhances your living space. The right fabric choices not only elevate the aesthetics of your divider but also ensure it meets your privacy and space management needs.
Maintenance Tips for Longevity
Maintaining your DIY room divider is essential to ensure its longevity and functionality. With regular care, you can keep it looking great and performing well for years to come. Here are some practical maintenance tips to help you preserve your investment.
Regular cleaning is crucial for maintaining the appearance of your room divider. Depending on the materials used, here are some effective cleaning methods:
- Wood Surfaces: Dust your wooden room divider with a soft, dry cloth. For deeper cleaning, use a damp cloth with a mild soap solution. Avoid harsh chemicals that can damage the finish.
- Fabric Panels: Vacuum fabric panels regularly to remove dust and debris. For stains, use a fabric cleaner according to the manufacturer's instructions. Always test on a small area first.
- Metal Components: Wipe down metal wheels and frames with a damp cloth. For rust prevention, consider applying a light coat of oil to moving parts.
Over time, wear and tear can occur. Here’s how to address minor damages:
- Scratches on Wood: Use a wood filler or touch-up marker to fill in scratches. Sand lightly and apply matching stain or finish for a seamless repair.
- Loose Fabric: If fabric panels become loose, reattach them using a staple gun or fabric glue. Ensure the fabric is taut to maintain a neat appearance.
- Wobbly Wheels: Check the screws and bolts holding the wheels in place. Tighten any loose components to ensure stability when moving the divider.
Establish a regular maintenance schedule to keep your room divider in top shape:
- Monthly: Dust and vacuum all surfaces, checking for any signs of damage.
- Seasonally: Perform a deeper clean and inspect for any repairs needed, such as tightening screws or refreshing finishes.
- Annually: Consider applying a protective finish to wooden surfaces and checking fabric for wear and tear.
Using the right products can enhance the maintenance of your DIY room divider:
- Wood Polish: A high-quality wood polish can help maintain the sheen of your divider and protect against moisture.
- Fabric Protector: Invest in a fabric protector spray to repel stains and spills on fabric panels.
- Lubricants for Wheels: Use a silicone spray or lubricant on wheels to ensure smooth movement and prevent rust.
By following these maintenance tips, you can ensure that your DIY room divider remains not only functional but also a beautiful addition to your space. Regular care will enhance its durability and keep it looking fresh and stylish.
Cleaning Your Divider
Maintaining the appearance and functionality of your DIY room divider is essential for ensuring it lasts for years while enhancing your living space. Cleaning different materials requires specific approaches to avoid damage and preserve aesthetics. Here are some best practices for effectively cleaning various materials used in your room divider.
Wooden room dividers can add warmth and elegance to any space, but they also require regular cleaning to prevent dust buildup and scratches. Follow these steps:
- Dust Regularly: Use a soft, dry microfiber cloth to gently wipe down the surface, removing dust without scratching the finish.
- Use Mild Cleaners: For deeper cleaning, mix a few drops of mild dish soap with warm water. Dampen a cloth with the solution and wipe the surface, then dry immediately with a clean cloth.
- Avoid Harsh Chemicals: Steer clear of abrasive cleaners and solvents, as they can damage the wood's finish.
Fabric dividers can enhance privacy while adding color and texture to your room. Here’s how to keep them clean:
- Vacuum Regularly: Use a vacuum with an upholstery attachment to remove dust and debris. This will help maintain the fabric's appearance.
- Spot Clean Stains: For spills, act quickly! Blot the area with a clean cloth and a mixture of water and mild detergent. Avoid rubbing, as this can spread the stain.
- Wash Removable Covers: If your fabric divider has removable covers, check the care label. Most can be machine washed on a gentle cycle.
If your room divider features metal elements, keeping them clean is crucial for preventing rust and corrosion:
- Wipe with a Damp Cloth: Use a damp cloth to remove dust and fingerprints. For stubborn spots, a mild detergent can be used.
- Apply a Metal Polish: To restore shine, consider using a metal polish specifically designed for the type of metal in your divider.
- Avoid Excess Moisture: Ensure that you dry metal parts thoroughly after cleaning to prevent moisture buildup.
Glass panels can give your divider a modern touch, but they require special attention:
- Use Glass Cleaner: Spray a glass cleaner on the surface and wipe with a lint-free cloth or paper towel for a streak-free shine.
- Handle with Care: Always clean glass with a gentle touch to avoid scratches or chips.
- Regular Maintenance: Clean glass panels regularly to prevent buildup of grime that can obscure visibility.
Regular cleaning and maintenance of your room divider not only keep it looking great but also prolong its lifespan. By following these best practices tailored to the specific materials of your divider, you can ensure that it remains a functional and stylish part of your home. Always remember to check the manufacturer's instructions for specific care guidelines to avoid any potential damage.
Repairing Minor Damage
When it comes to maintaining your DIY room divider, addressing minor damages promptly is essential to ensure its longevity and functionality. Whether it’s a scratch, dent, or loose wheel, knowing how to fix these issues can save you time and money. Here’s a comprehensive guide on how to effectively repair minor damages to your room divider.
- Scratches: Surface scratches can occur from everyday use or accidental contact.
- Dents: Dents can happen if the divider is bumped or knocked over.
- Loose Components: Wheels or panels may become loose over time, affecting stability.
- Water Damage: Exposure to moisture can warp wood or damage fabric.
To repair scratches on wooden surfaces, you can use the following methods:
- Wood Filler: For deeper scratches, apply a matching wood filler. Once it dries, sand it smooth and refinish the area.
- Walnut Method: Rub a walnut over the scratch. The natural oils can help conceal minor imperfections.
- Furniture Polish: For light scratches, applying a good quality furniture polish can help blend the scratch with the surrounding area.
Dents can be easily fixed using these methods:
- Steam Method: Place a damp cloth over the dent and apply a hot iron briefly. The steam will cause the wood fibers to swell back into place.
- Wood Putty: For larger dents, fill with wood putty, let it dry, and sand it down for a smooth finish.
Loose wheels or panels can be a hassle. Here’s how to secure them:
- Tightening Screws: Regularly check and tighten screws on wheels and hinges to ensure stability.
- Replacing Wheels: If wheels are damaged, replace them with new ones that match the weight capacity of the divider.
Water damage can compromise the integrity of your room divider. Here’s how to tackle it:
- Drying: If your divider gets wet, dry it immediately with a towel and allow it to air dry completely.
- Refinishing: For warped wood, you may need to sand it down and apply a protective finish to prevent future damage.
To keep your room divider in excellent condition, consider these preventative tips:
- Regular Maintenance: Conduct regular checks for any signs of wear and tear.
- Use Protective Covers: When not in use, consider using a cover to protect it from dust and moisture.
- Proper Handling: Always handle the divider with care to avoid unnecessary damage.
By following these simple steps, you can effectively address and repair minor damages to your room divider, ensuring it continues to serve its purpose effectively and enhances your living space for years to come.
Frequently Asked Questions
- What materials do I need to create a DIY room divider?
You’ll need wood (either plywood or solid wood), fabric for privacy, wheels for mobility, and various tools like saws and drills for assembly. Don’t forget safety gear like goggles and gloves!
- How do I choose the right type of wood for my room divider?
Consider durability, weight, and aesthetic appeal. Plywood is often lighter and more cost-effective, while solid wood offers a sturdier and more premium look. Think about what fits your style and budget!
- Can I customize the design of my room divider?
Absolutely! One of the best parts of a DIY project is the ability to tailor it to your taste. You can choose different fabrics, colors, and even painting techniques to match your decor.
- How do I maintain my DIY room divider?
Regular cleaning is key! Use appropriate cleaning methods for the materials you’ve chosen. For minor damages, simple repairs can keep it looking great and functional for years to come.
- Are there specific wheels I should use for my room divider?
Yes! Look for sturdy wheels that can support the weight of your divider. Swivel wheels are great for easy movement, but ensure they lock in place when you want stability.